As their name suggests, use the structural columns to add load-bearing vertical elements to the model and use architectural columns to add decorative vertical elements. Structural elements such as beams, braces, and isolated foundations join to structural columns; they do not join to architectural columns.
As their name suggests, use the structural columns to add load-bearing vertical elements to the model and use architectural columns to add decorative vertical elements. Structural elements such as beams, braces, and isolated foundations join to structural columns; they do not join to architectural columns.
Add an architectural column surrounding the structural column on Grid B-4 in the Ground Floor layout as shown below.
Height of both columns: Ground Level to First floor level
Structural Column: UC-Universal Column Type 254x254x73UC
Architectural Column: Architectural-Column-Rectangular type 300 x 300
Sample Files required for this tutorial:
If you do not have the following files, please download them from here.
“TutorialColumns_Input_LearningRevitOnline.rvt”
Column Family files: “UC-Universal Column.rfa” and “Architectural-Column-Rectangular.rfa”
Solution:
Open tutorial file ‘TutorialColumns_Input_LearningRevitOnline.rvt’ in Revit. This project file already contains levels, grids and walls on ground floor level.
Click Insert tab -> Load from Library panel -> Load Family -> Navigate to the folder where above families are located on your computer -> Select them -> Open.
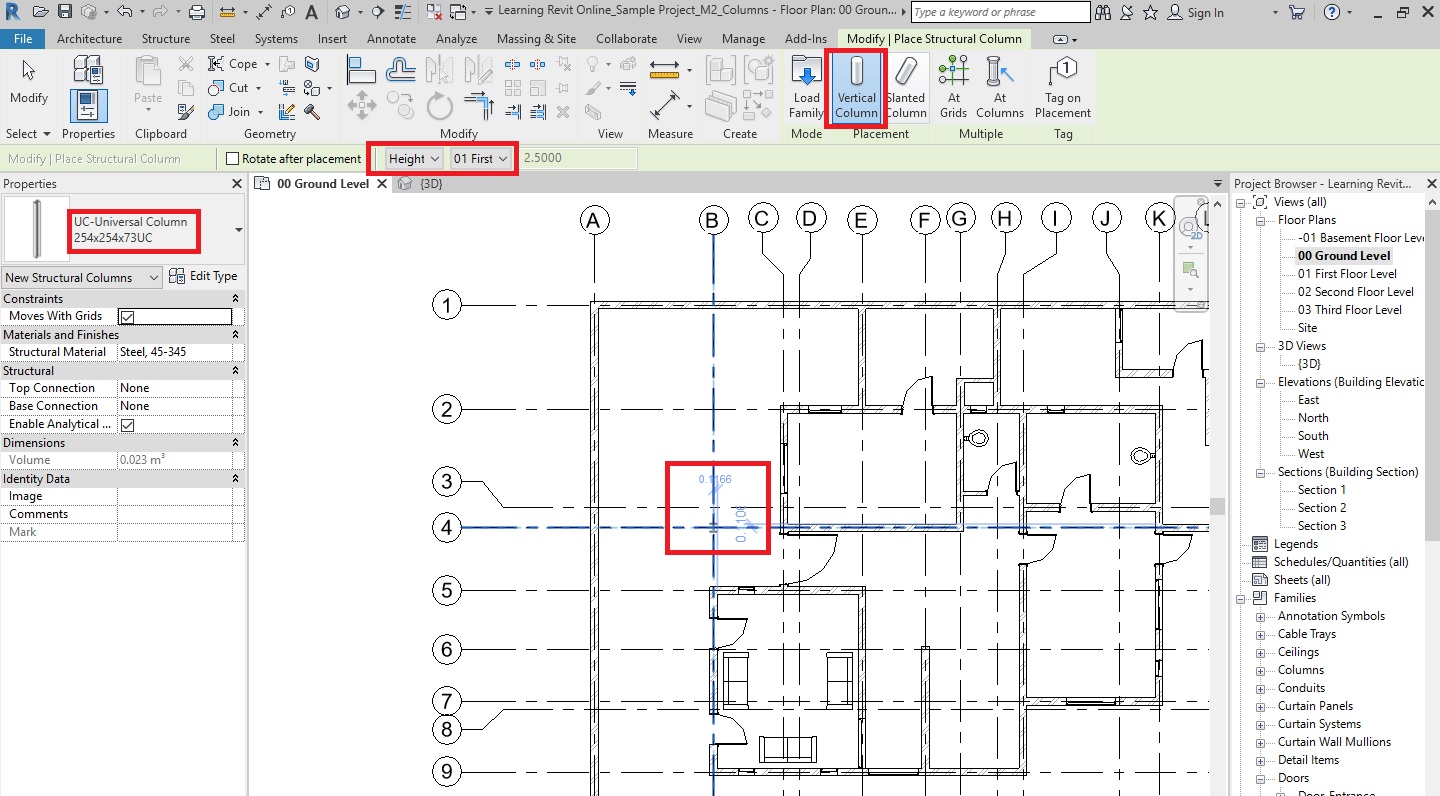
To place a structural column:
Go to Structure tab -> Structure panel -> Column
Alternatively, use “CL” as the keyboard shortcut .
From the Modify|Place Structural Column tab , select vertical column.
From the type selector, select the type 254x254x73UC of the UC-Universal Column family you loaded in step 3.
On the options bar, select the Height and constraint it to First Floor level.
In the drawing area, notice that column’s center automatically tries to snap at the grid intersections. Click at the grid intersection B-4 to place the column.
Click Esc twice to end the Column tool.
Now, we would like to place a rectangular architectural column that surrounds the structural column that we placed in step 4.
To place an architectural column:
Go to Architecture tab -> Build panel -> Column drop-down -> Column: Architectural
From the type selector,select the type 300 x 300 of the Architectural-Column-Rectangular family you loaded in step 3.
If you do not have this type, create a new type by duplicating the existing one and changing the width and height value of the type parameters to 300mm.
On the options bar, select the Height and constraint it to First Floor level.
On the options bar, select the ‘Room bounding’ option. This will ensure that the boundary of the column is part of the boundary of the room along with other room bounding elements when you create a room.
In the drawing area, notice that column’s center automatically tries to snap at the grid intersections. Click at the grid intersection B-4 to place the column.
Click Esc twice to end the Column tool.
Now, we have a structural column that is surrounded by an architectural column.
Go to a 3D view to see these columns in a 3D.
After completing all the steps above, Save As your project as “TutorialColumns_Output_LearningRevitOnline.rvt”.
More about Columns:
How to Attach Columns with roofs, floors, ceilings, reference planes, structural framing members, isolated foundations, foundation slabs, and other reference levels.